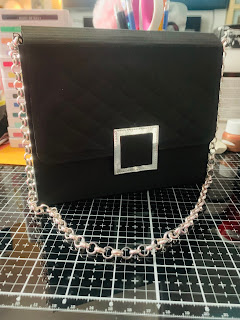
So today’s blog is about the beautiful gift hand bag that I created.
I created this bag after looking at some bags made by some very talented crafters call Danielle J Rose and Samantha Clayton.
So I decided to design my own take of this timeless classic gift bag.
To make this bag you will need several pieces of card, some Velcro closures or magnets , an embossing folder or DSP, stitched framelets dies , a corner rounder, strong glue, a pair of pliers , and a length of chain.
I will list each piece of card with the scoring
1 sheet A4 (11 3/4” x 81/4”)
Scoring
Short side 1 1/2” & 8”
Long side 1 1/2”, 6 1/2”, 6 5/8” ,6 3/4”, 6 7/8”,7”, 7 1/8”, 7 1/4” 7 3/8”, 7 1/2”, 7 5/8”, 7 3/4”, 7 5/8” 7 3/8” , 7 7/8” 8” 8 1/8”, 8 1/4”
A piece that measures 6 1/2” x 8 1/4”
Scoring
Short side 1 1/2”
Long side 1 1/2” , 8 1/4”
A piece of embossed card or DSP that measures 3 1/4” x 6 1/4”
And a piece of embossed card or DSP that measures 5” x6 1/4”
A piece of foil card and a piece of card cut with the 2nd to smallest square in the stitched framelets dies set,
And 3 pieces of card cut with the smallest square frame the same set
And 2 pieces of card that are 2” x 1/2”
After scoring you card cut and remove the shaded sections as shown in the pictures below
Also not out the square corners from the bottom free edge
Fold and burnish score lines apart from the ones on the larger piece between the 6 1/2” point and the 8 1/4” mark as they will form the curve for the top of your hand bag. Before gluing your bag together punch the corners of the smaller flap on the large piece of card .Then attach the embossed pieces to the outside of the larger piece. Apply glue to the thin parts of your card and attach to the 1 1/2” flap of your card thus forming the sides of your bag. Fold and glue the bottom of your bag to complete the bag form . Layer the 3 small squares and the larger silver square, then affix to the bag flap leaving half of the square hanging off the free edge . It is at this point if you are using magnets you should glue them into place now before adding the larger square to the back of the silver square.
Using the pliers form loops at each end of your chain that are large enough to hold the 2” x 1/2” pieces of card. Fold the 2” x 1/2” piece of card in 2 and glue the ends together using strong glue before attaching each end to the sides of the bag.
Thank you for reading my blog today and I hope you enjoy making this project
Love Kayla xXx
Product List To make this bag you will need several pieces of card, some Velcro closures or magnets , an embossing folder or DSP, stitched framelets dies , a corner rounder, strong glue, a pair of pliers , and a length of chain.
I will list each piece of card with the scoring
1 sheet A4 (11 3/4” x 81/4”)
Scoring
Short side 1 1/2” & 8”
Long side 1 1/2”, 6 1/2”, 6 5/8” ,6 3/4”, 6 7/8”,7”, 7 1/8”, 7 1/4” 7 3/8”, 7 1/2”, 7 5/8”, 7 3/4”, 7 5/8” 7 3/8” , 7 7/8” 8” 8 1/8”, 8 1/4”
A piece that measures 6 1/2” x 8 1/4”
Scoring
Short side 1 1/2”
Long side 1 1/2” , 8 1/4”
A piece of embossed card or DSP that measures 3 1/4” x 6 1/4”
And a piece of embossed card or DSP that measures 5” x6 1/4”
A piece of foil card and a piece of card cut with the 2nd to smallest square in the stitched framelets dies set,
And 3 pieces of card cut with the smallest square frame the same set
And 2 pieces of card that are 2” x 1/2”
After scoring you card cut and remove the shaded sections as shown in the pictures below
Also not out the square corners from the bottom free edge
Fold and burnish score lines apart from the ones on the larger piece between the 6 1/2” point and the 8 1/4” mark as they will form the curve for the top of your hand bag. Before gluing your bag together punch the corners of the smaller flap on the large piece of card .Then attach the embossed pieces to the outside of the larger piece. Apply glue to the thin parts of your card and attach to the 1 1/2” flap of your card thus forming the sides of your bag. Fold and glue the bottom of your bag to complete the bag form . Layer the 3 small squares and the larger silver square, then affix to the bag flap leaving half of the square hanging off the free edge . It is at this point if you are using magnets you should glue them into place now before adding the larger square to the back of the silver square.
Using the pliers form loops at each end of your chain that are large enough to hold the 2” x 1/2” pieces of card. Fold the 2” x 1/2” piece of card in 2 and glue the ends together using strong glue before attaching each end to the sides of the bag.
Thank you for reading my blog today and I hope you enjoy making this project
Love Kayla xXx


Love this xx
ReplyDeleteThis looks really sophisticated & elegant. Love the black and the chain you done for the strap, it's beautiful Kayla.
ReplyDelete