Friday, December 4, 2020

Poinsettia Christmas Card

 Hello again and welcome to my blog 

Todays little treat for you today is my sparkly Poinsettia card 

When I first sat this set and the red velvet sheets I knew I had to do a velvet poinsettia but then I saw the balmy blue glitter sheets as well but had a I love it so much I don’t want to cut it moment which left it sitting on my shelf for a few weeks while inspiration grew to a I must cut this paper now and make this card moment!


Well  I did it I cut it and the red velvet paper which i must admit i had to stroke a few time before i finally cut it ready for this project 


What do you think ? Was it worth it 

Yes i think so this card is soooooooo sparkly and Tactile I LOVE it ! 


So where to begin ....... 

I will admit this card would have been a lot easier to do if I had brought the dies to match the stamp set !

I however sat and fussy cut out all the elements to this card so it is possible to do without the dies for those of you that do not have a die cutting machine or like me just didn’t buy the dies.

I will however link below the dies for those that wish to buy them 


Now I have to say I found stamping onto the red velvet sheet challenging but found that you NEED to stamp it with stazon ink or it just gets rubbed into the felt making a muddy mess (which I found out the hard way)

I stamped all 3 layers of the poinsettia onto the red velvet to make the central flower the largest and only the 2 smaller layers x2 for the side flowers onto whisper white card , which I coloured in using my blends I also stamped coloured and fussy cut out 4 leaves to add to my card

Once I had fussy cut out all my flower layers I gently molded the leaves to give a more natural look before assembling  each flower using liquid glue. 

I used a standard card base with a layer of the balmy blue glitter paper added to the front.

I found that I had to hold the flowers a few seconds longer than normal to grip to the glitter paper . 

I then stamped the sentiment onto a scrap piece of paper and cut into a Flag shape which I then nestled into the flowers.


To give this card that last little bit of wow factor I added a gem from my stash which wasn’t the gem I intended on using as I wanted to use the poinsettia centres that come with the suite that Ihave somehow miss placed but never mind I think it really finishes the card 

I hope that you love this card as much as I do the sparkle is Amazing ! 

Love 

Kayla xXx 


Product List

Wednesday, December 2, 2020

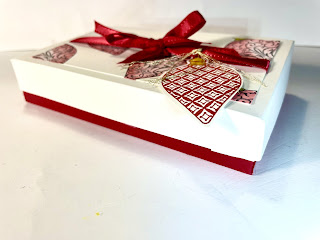
Christmas gleaming box

 Hello and welcome back to my blog today I thought I would share a Christmas box ideal for gifting chocolates in fact this one has been designed to go around a 4 pack of dairy milk.

The box measures 5 1/4” x 3 1/4” by 1” high 

I decided that rather than use DSP on this box I would do a bit of stamping and water colouring using my wink of Stella pen and am really happy with the gorgeous shimmer over the stamped images, making the box even more festive ! 


Isn’t it gorgeous I just love the read red ribbon and colour on all the ornaments 

I even made the base of the box in real red ! 


So how to make this box I  started with  a piece of card measuring 7 1/4” x 5 1/4”  and scored at 1” all around 
I then got another piece of card that measures 6 3/4” x 4 3/4” scored at 3/4” all round 

I frost constructed the larger piece into a box base then using that base I created the lid by wrapping the lid around it so that it fit snugly 

I then took a piece of whisper white card measuring 4 3/4” by 2 3/4” and stamped it with one of the ornament stamps from Christmas gleaming  to colour the stamped images I added 1 drop of real red re inker to a stamping block and added a few drops of wink of Stella and using my wink of Stella bulrush i water coloured with the mixture. I added this to my box with a piece of real Red ribbon tied around it in a bow using liquid glue 

I then stamped another ornament from the stamp set onto a scrap piece of card and punched it out using the coordinating punch set and i then pinched a 1/8” hole in the top to allow for my gold thread to pass through and attached it to the red ribbon 


I hope you have found this tutorial helpful and look forward to seeing you again soon 

Love 
Kayla xXx 


Product List

Friday, November 27, 2020

Curvy dragonfly card

 Next in my curvy creations Series is this beautiful dragonfly card 

using the soon to be release dragonfly garden suite !


I just love this suite as it has a punch for quick and effective cutting out that even the most novice of crafters can enjoy without laying out for a die cutting machine.


Anyway back to the card ! 

I used a standard card base and layered a piece of the Danny garden DSP measuring 55/8” x 37/8” on to the card which I stamped my sentiment directly on. I used memento ink but in hindsight I should have used stazon for a bolder effect.

I then cut 2 pieced of whisper white card using the curvy dies and stamped onto them using the sprig  stamp from the curvy Christmas stamp set in pretty peacock. 

I glued the rear piece directly onto my card base with the DSP and then attached the front piece using dimensionals to give it some depth. 

Next I stamped 2 dragonflies from the dragonfly garden stampset onto Vellum I then coloured the reverse of each dragonfly using my stampin’ blends in night of navy, seaside spray, Granny apple green , calypso coral and mango melody  before punching them out I then attached them to my card using mini dimensionals. 

I hope this has inspired you to create you own card 

Love Kayla xXx 

Note I will add links to the dragonfly suite once it becomes available  


Product List

Wednesday, November 25, 2020

A sweet selection box

 Every year I make something for my children ( who are all grown ups I hasten to add) 

That is sweet based this year I found a tutorial by another crafter Sam Callcott 

And decided to CASE  it and these are the boxes I came up with the tutorial is super easy to follow  with amazing results 


Aren’t they amazing !

I made 3 for my children and 1 for a friend and love each of them 

To begin you will need a several pieces of card stock  

Piece 1
8 1/4” x 11” 
scoring the long side at 1/2, 11/2”,10”
And the short side at 1”,71/4”
You will need to cut out the center of the card leaving  a 1” border
Piece 2 
81/4” x 91/2”
Scoring the long side at 81/2”
And the short side at 1”,71/4”
Piece 3 
71/4” x 81/2” 
Score short side at 1” 

You will need a piece of acetate cut to 51/2”x 71/2”

A piece of  gold card cut to 53/4” x 8” with the center cut out leaving a 7/8” border 
And a piece of cardstock or DSP cut to 71/2” x 51/4” with the center cut out leaving a 5/8” border

You will also needed 

X2 pieces of gold cardstock cut to 81/4” x 6”
X2 DSP cut to 8”x 53/4”


To construct the box layer up the acetate and the 2 cut out pieces of gold and DSP /cardstock pieces add them to piece 1 on the outside next add piece 2 to piece one making sure the bottom lines up glue the end without the 1/2 “ flap down 


Add the gold sands DSP layers to both sides of piece 3 before adding to the main box
I found it easier to load my box before adding the lid as it helped the box maintain its shape.


For box 4 I added a piece of silver paper to create a pocket for a gift card or money to be added which is optional 

Product List